
Location within the Borrower Portal
Borrowers can navigate to Documents in their portal, where they'll find any loan documents previously shared with them.

Uploading Documents
To add a document, the borrower clicks Upload Document within the Documents tab. From there, they can select one or more files from their computer or drag and drop files directly.
Receiving Notifications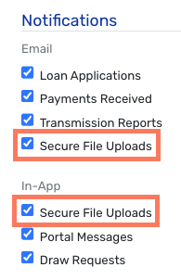
You can receive automated notifications whenever a borrower uploads files. To turn these on, click the profile icon in the top-right corner of TMO and select Profile.
Two options are available, both labeled Secure File Uploads: one under Email and one under In-App.
In-app notifications appear in the Notifications panel alongside your other notifications, and they identify which borrower uploaded which attachment.
NOTE: When a borrower uploads a document, it is not shared back to their portal by default. To publish a document so the borrower can see it, check the box next to each attachment you want to make visible.