
Workflow Overview
If your organization uses HUB Financial Services (formerly Miniter Group) for lender-placed (force-placed) insurance tracking, you can review and pay their invoices right inside The Mortgage Office. Marketplace > Billing page shows every outstanding charge into your existing workflow, organized by loan and borrower, so you can review what's owed and pay it in a single transaction. From here on, we'll use the name Miniter, since that's what appears in the product.
For an interactive tour of the Miniter payment process, please visit here.
Accessing the Billing Screen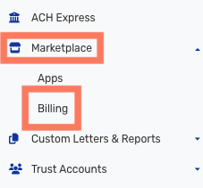
The TMO Marketplace hosts records for all charges coming from Miniter's insurance tracking integration. To locate this page, navigate to Marketplace > Billing.
Once on the billing page, you'll see Miniter as well as an option to  bills.
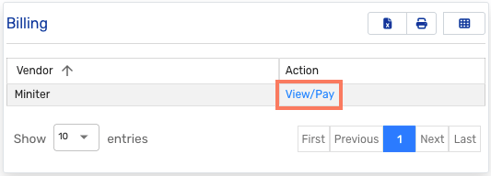
Selecting View/Pay opens the Miniter tab on the Unpaid view, where every outstanding charge is listed with its loan number, borrower name, description, certificate number, date billed, and amount. Charges are organized into two groups:
Using the Billing Screen
The Billing screen has two tabs at the top. One tab consolidates Unpaid bills, with the other tab focusing on Payment History. The Unpaid bills section created expandable entries for every bill.
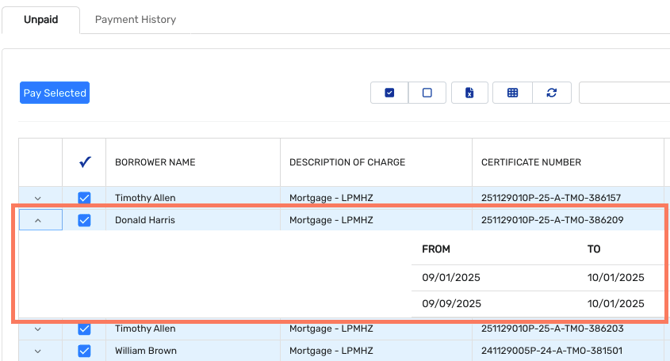
- Premium charges: Insurance premium charges are grouped by certificate. Each row totals everything billed on that certificate. Select the arrow
 to expand a row and see the individual billing periods (From and To dates), the date each was billed, and its amount. You can check or clear these rows to choose which certificates to pay, but once a certificate is selected, its full balance is paid together; individual periods within it can't be paid separately.
 - Tracking and other fees: Monthly tracking and other fees, such as assumption charges, origination charges, or P.O. Box fees, are broken out by fee type and date billed, with a count of the loans included (for example, “Monthly Assumption Charge (7 loans)”). These rows are always selected and their checkboxes are locked, so required recurring fees are never accidentally left unpaid.
Submitting Payment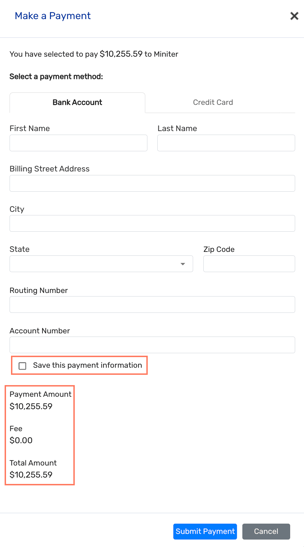
Once you've selected the charges you want to include, in addition to any locked fee rows, select Pay Selected. 
This button stays disabled until at least one charge is selected.
The Make a Payment panel shows the total you're about to send Miniter. Choose Bank Account or Credit Card, enter the billing and account or card details, and, if you'd like, check Save this payment information, so you don't have to re-enter it next time. Confirm the Payment Amount, Fee, and Total Amount, then select Submit Payment.
Viewing Payment History
Switch to the Payment History tab on the same Miniter screen to see a log of every payment that's been closed out, including the date it was closed and paid and who closed and paid it.
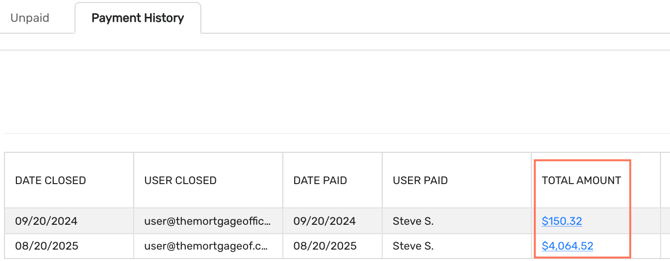
Select any Total Amount to open Billing Details, a line-by-line list of every charge included in that payment: loan account, borrower name, description, the date each charge was issued and billed, and the amount paid.
Exporting Charges to Excel
Need the data outside The Mortgage Office? Use the export button  above the grid to download a flattened spreadsheet of every charge, including Loan Number, Borrower Name, Description of Charge, Certificate Number, Date Billed, Amount, and, for premium charges, the From and To billing period.