
Uploading Attachments
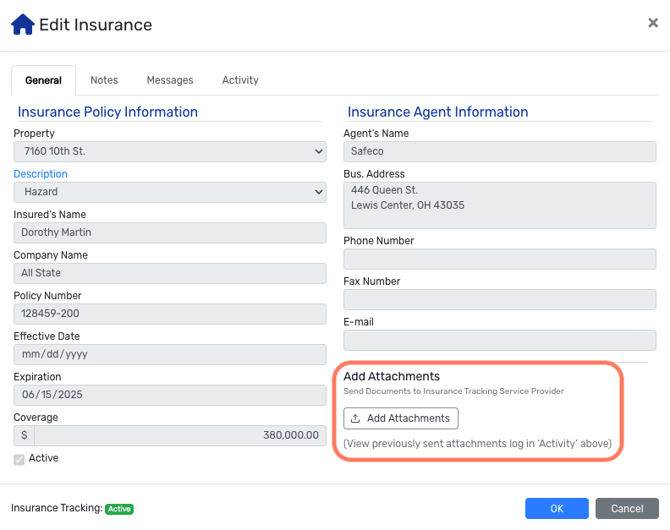
Once an insurance policy is being tracked, all fields are read-only and will automatically update when new information becomes available. If you receive updated insurance information, follow these steps:
- Go to the Insurance screen (Properties > Insurance Tracking > All Insurance Policies).
- Click the Add Attachments link to send the policy information to the insurance tracking service provider.
- The provider will review the document and update the policy details accordingly.
You can attach documents to an insurance policy directly from within the Insurance screen, either by selecting files already uploaded to the loan, or by uploading new files from your computer.
Note: The Add Attachments option is only available when insurance tracking is active for the policy.
Opening the Add Attachments Modal
On the Insurance screen, click Add Attachments. A modal will open showing all files currently attached to the loan and property.
Option 1: Select Existing Loan or Property Attachments
The modal displays attachments organized by tabs (e.g., All, Insurance, General). Use these tabs to browse available files.
- Search: Use the search box at the top of the modal to find a specific file by name.
- Select files: Check the box next to any file(s) you want to attach to the insurance policy.
Option 2: Upload New Files
If the document you need isn't already in the loan file, you can upload it directly from the Add Attachments modal.
- Click
 button in the top-right.
 - Add files using either method:
- Select Files — opens your system file browser to choose one or more files.
- Drag and Drop — drag files directly into the modal.
- For each file, configure the following:
- Add To Location — choose Loan (default) or Property.
- Add to Tab — select which tab the file should appear under (defaults to All). Available tabs update based on the selected location (Loan vs Property).
- Description — optional. If left blank, the file name is used.
- To remove a file before confirming, click the [X] button on its row.
- Any uploaded files are retained and stay selected. To continue selecting any previously uploaded attachments, click
 .
.
Supported file types: PDF, Word (doc/docx), Excel (xls/xlsx), PowerPoint (ppt/pptx), plain text (txt, csv, rtf), images (jpg, jpeg, png, webp, bmp, tif, tiff, heic, svg), archives (zip, 7z), email (msg, eml), XML, JSON, HTML, and common audio/video formats (mp4, mov, webm, mkv, mp3, wav, m4a, aac, flac).
File size limit: 25 MB per file. Files that exceed the limit or use an unsupported type will be flagged with an error and excluded from the upload — other valid files in the same session are unaffected.
Combining Existing and New Attachments
You can mix and match: select files already in the loan file and upload new ones in the same session. All selected files are reflected in the attachment counter at the top of the modal.
Confirming or Canceling
- Click
 to confirm. All selected and newly uploaded files are saved to their designated location and tab, and will appear on the Insurance screen.
 - Click Cancel or the [X] close icon to discard all changes. No files will be attached and any uploads from that session will be discarded.